|


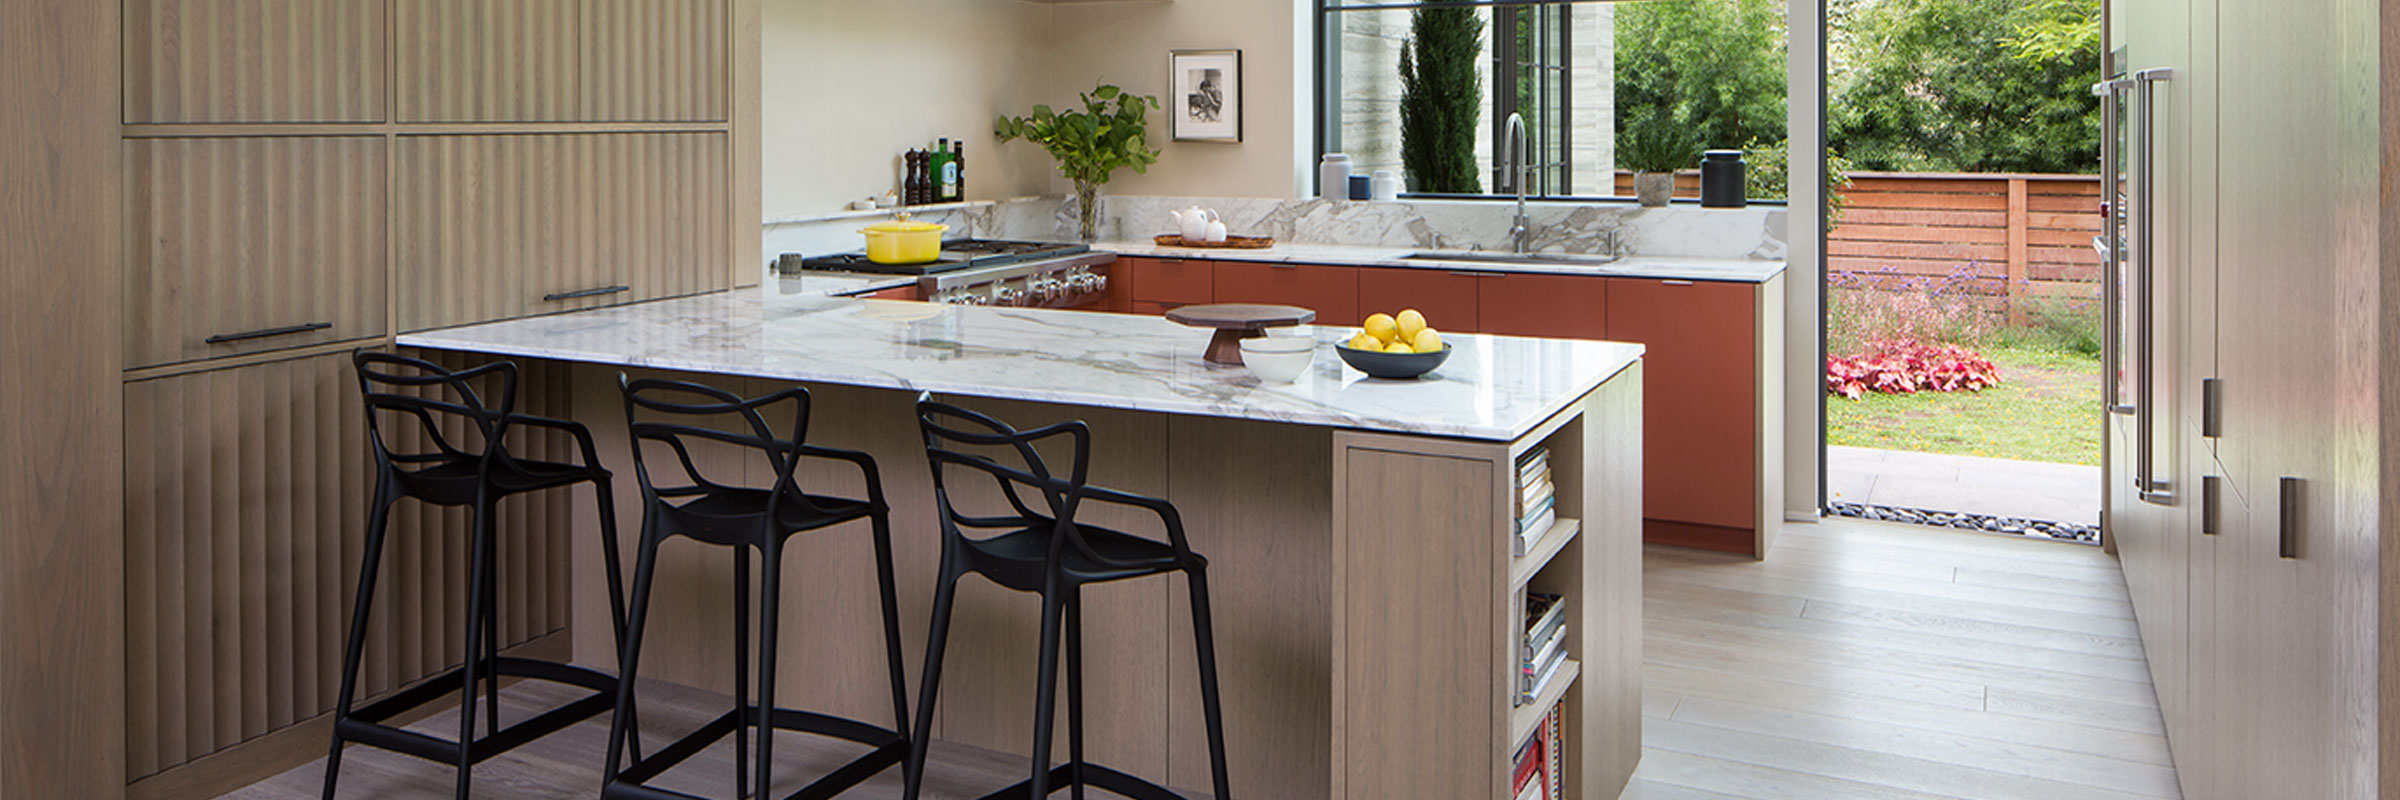

Yes. Please request elevation drawings at the time of placing your order by writing us at info@dcabinets.com. We will always send you detailed confirmation drawings of each piece for your approval prior to production. Once you receive your confirmation drawings, please return them promptly with corrections, comments, date and signature. Any delay in their return may cause a change in the projected completion date.
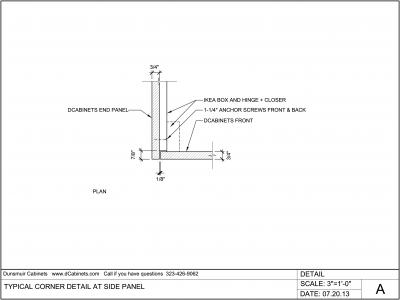
Drawing A, right, demonstrates our typical corner detail, where the end panel is flush with the cabinet front. A Dunsmuir Cabinets front and hardware extend 7/8" in front of the cabinet box. To design a flush end-panel detail, measure the distance from the wall surface to a point 7/8" in front of the IKEA cabinet box. If the wall surface is not smooth or plumb, you may subtract 1/8" in the width of the panel to create a small uneven reveal along the wall surface, or add 1/2" to the width and scribe cut to the wall. A scribe cut should only be made by a skilled craftsman. Then repeat this same measurement and detail for all subsequent end panels. This will result in a consistent wall reveal or flush edge.
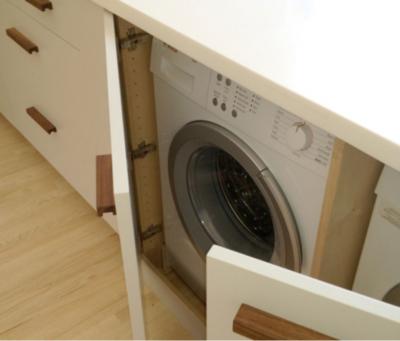
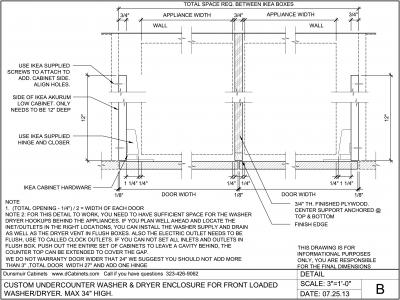
Using Dunsmuir Cabinets, it is simple to conceal under-counter appliances without integrated fronts.
First, select small European-style under-counter appliances and make certain there is ample space behind the machine and wall for plumbing, electric and vent connections. This may be accomplished by leaving a gap behind all the base cabinet boxes that will be covered with an extended substrate and countertop, or by mounting the utility connections recessed in the finished wall. Many times, you will need to do a combination of both.
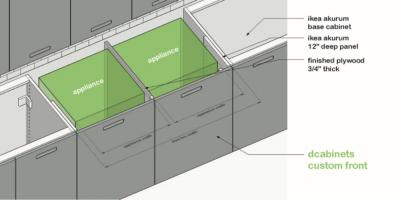
Second, most under-counter appliances are too wide for a standard 24" wide fronts. You will need to take both sides of a 24" IKEA base cabinet box and attach them (plumb and level) to the adjacent cabinet boxes or finished wall surface. These panels will be used to secure the standard IKEA hinges that support the custom fronts. The total space required between IKEA boxes needs to be the sum of appliance widths, plus the width of the hinges, the 3/4" center support and a minimum of 1/4" either side of the appliance to comfortably install the unit. The countertop requires a 3/4" plywood substrate and vertical center support to span both appliances without sagging. Select finished plywood and matching front edge strip. The countertop or substrate should never rest on the appliances, as they vibrate when in use and need to be removed for service.
The custom Dunsmuir Cabinets fronts will be the same height as the adjacent, and use the same 1/8" tolerance spacing between fronts. If the resulting door width is greater than 24", request and additional center hinge. Any door wider than 24" cannot be warrantied and might sag over time.
See Detail B, right, for dimensions.
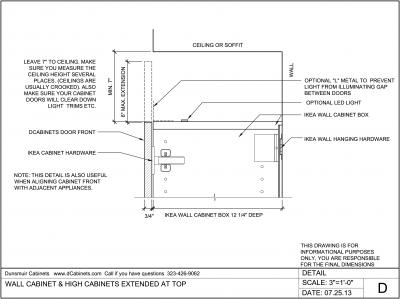
You may customize wall cabinets and high cabinets by adding up to 6" to the top of doors using the Dcabinets online Design tool. On our home page (dcabinets.com) click the Start Designing button and follow the prompts to the Design page. Then click the green plus sign to add a standard IKEA item. Drag the cursor over the item selected until the white pop-up window appears and click customize. Always leave 1/2 or 3/4 inches between the cabinet door and ceiling for clearance from ceiling down lights and vents. This will create a custom built-in look without a bulky soffit. Make sure you consider any obstructions in the ceiling that might prevent you from opening the doors (lighting fixtures, smoke alarms and ceiling beams).
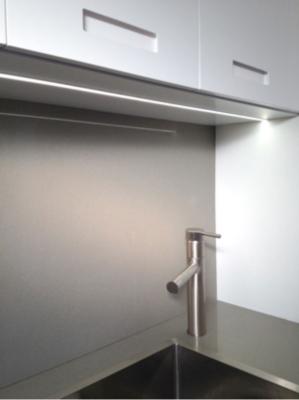
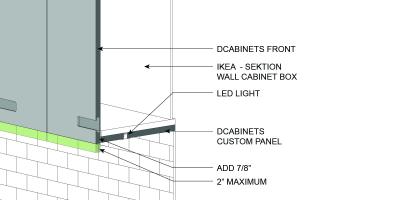
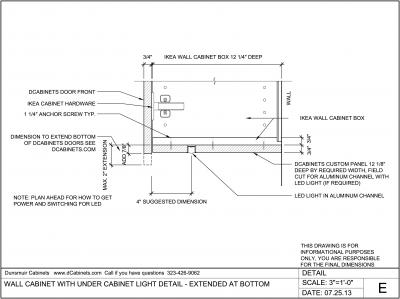
This detail requires a continuous matching Dunsmuir Cabinets panel under the wall cabinets (either one panel, cut lengthwise, or two panels ordered exactly to size). Finally, add a minimum of 7/8" (maximum of 2") to the bottom of the cabinet fronts, and up to 6" to the top (depending upon the ceiling height) to conceal the lighting strip and create an indirect lighting source.
The strip under-cabinet light in the picture is:
Prolite Aluminum Deep flush mount channel with frosted cover and associated LED strip light and power supply.
Dunsmuir Cabinets doors allow a horizontal clearance of 1/8" between cabinet doors, 1/16" between drawer fronts, and 1/8" between countertops and the top of base cabinet doors. Always confirm counter clearance by using the proper substrate and edge detail. Your kitchen design should allow a minimum clearance of 3/16" around built-in appliances (dishwasher, built-in ovens, microwaves and refrigerators) and a minimum of 1/4"- 1/2" around inset refrigerators. Always consult your appliance manufacturer's specifications and installation requirements, using their home website and correct model number, to establish the precise requirements. Dcabinets will make custom fronts to suit your custom design needs. Contact us at info@dcabinets.com if you are unsure or require assistance. We will review the recommended clearances. Finally, always design your kitchen in plan and allow clearance for doors and drawers to open without striking adjacent cabinets, appliances, metal hardware or adjacent walls. Remember that IKEA door hardware will open wider than 90 degrees, and 150 degrees for all interior pull-outs.
IKEA SEKTION cabinets use integrated plastic clips to attach toe kicks to supports. This clip style is not compatible with the custom materials we provide.
We highly recommend purchasing aftermarket mounting clips.
Google for options: Cabinet leveler leg toe kick bracket connector mounting flanges for 1.53 inch adjustable furniture legs
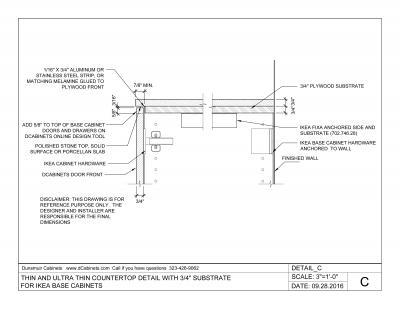
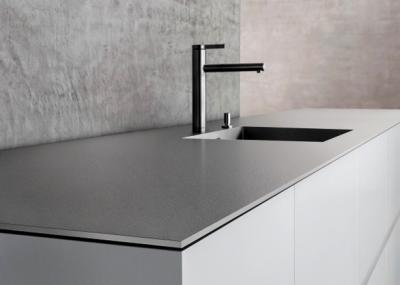
Assemble your IKEA base cabinets (level and plumb) and secure a finished 3/4" plywood substrate for the countertop, using IKEA Fixa anchor strips (702.746.28). Avoid plywood seams except on inside corners of the countertop. Allow 1/8" between the front edge of the smooth plywood substrate and the front of IKEA box. Glue a continuous 3/4" x 1/16" aluminum or brushed stainless steel strip to the front of plywood, flush with the IKEA box using a professional adhesive. Glue the stone top to the substrate leaving a minimum 7/8" lip. The substrate will guarantee a level stone top surface. Add 5/8" to the top of each base cabinet door using the Dcabinets online Design tool. You may also add this note to your order or email us at info@dcabinets.com. This detail allows a 1/8" tolerance between base doors and the underside of countertop. It does however elevate the height of base doors and all adjacent doors should match. Since it changes the proportion of drawer fronts, this detail works best with full height base doors in small kitchens or coffee counters. Thin countertops allow the use of (3/4" to 3/8") stone tops, solid surface materials, synthetic quartz and porcelain slabs.
The premium standard for wood finishing in North America is a professionally applied catalyzed conversion varnish, our standard finish. The top coat is post catalyzed, fast drying, and acid cured varnish. Its chemical and moisture resistant qualities makes it an ideal finish for kitchens and bathroom cabinets. The gloss level of our top coat is 10.
We use several manufacturers depending on who will best make the cabinets you ordered. Most orders are made in the Los Ageles area or outside Toronto, Canada. If you are close to one of these locations we can arrange for will call pick up. Please contact us at info@dcabinets.com or call (323) 426-9062 to discuss the particulars of your order.
Yes, we ship to Canada. Please contact us with the specifics and we can give you a shipping estimate depending on destination, weight and size of shipment.
Dunsmuir Cabinets are designed to fit IKEA box and hardware locations and to allow precise clearances in accordance with your custom design. The hardware patterns of your custom fronts may not correspond to the standard IKEA instructions. Cabinet fronts should never be installed so they hit or rub against other fronts as this may cause damage. Consult your design drawings and the sticker on the back of each panel to locate each piece before installing. Once you install your Dunsmuir Cabinets fronts properly, the IKEA kitchen hardware allows you to easily adjust each panel vertically and horizontally, or to remove it completely and relocate.
Dunsmuir Cabinets fronts cannot be installed properly if your IKEA cabinet boxes are not plumb and level or if your door hardware is installed in the wrong location. Check your cabinet boxes with a level prior to installing fronts. Use the kitchen installation instructions provided by IKEA if you are uncertain or require further information. There are also great visual resources on YouTube, and you may always Google your question to find additional video instructions.
Our painted panels are finished with a Catalyzed Cenversion varnis the standard for kitchen cabinets. It is an outstanding paint, fully heat, water and abrasion resistant. But sometimes kitchen accidents do happen even to the best materials. This is how we suggest touching up our painted panels:
Always follow the cleaning instructions on our Help page. Where vigorous rubbing or polishing with abrasive cleaners has created a shiny spot in the satin finish: Even out the sheen by first cleaning with alcohol and lightly spraying a water base clear lacquer onto the clean surface. Use this product: Mohawk Perfect Blend Waterborne Lacquer M102-0613 Matt 19-23 sheen aerosol spray can. Follow the instructions on the can for application.
To fill small corner nicks and dings: Use a wax Mohawk fil-stick to fill the nick and then secure the repair with clear spray lacquer listed above.
Mohawk fil-stick in colors matching dcabinets standard colors:
P1 Warm White -use M231-9844
P2 Cool White - use M231-8618
P3 Gray - use M231-1476
P7 Dark Gray - use M230-4029
At Dunsmuir Cabinets, our craftsmen use the finest materials, techniques and finishes. The following is a guide to preserve the original look of your cabinets for many years to come.
General cleaning should be done using only warm water, a mild liquid dish soap and a soft drying cloth. A more effective all-purpose cleaner may be made of warm water and one-eighth portion of vinegar and rubbing alcohol with a few drops of dish soap. Vinegar is a natural acid that lifts stuck-on food. Alcohol cuts through mild grease and oils. While dish soap lathers stains making it easier to clean. Wipe the cabinets, rinse with a warm damp towel and dry with a soft cotton or microfiber cloth. Do not apply a wax coating to increase the sheen, as this will add an additional layer or film and create shiny spots. To remove tape glue, adhesives or oil stains, preclean with a mild solvent such as Goo Gone, vodka or Castile soap before washing. Never leave these solvents on the surface as they may soften the finish.
Different cabinet surfaces require unique cleaning techniques and rituals. Here are a few easy tips. Our clear coated woods and painted cabinets have a 20% low sheen finish. Low sheen or satin finishes should never be scrubbed or burnished in one spot as this may polish the surface and increase the luster resulting in permanent shiny spots. Use a gentle cleaner in a spray bottle to better control the amount and location, and carefully dry integrated pulls. Dark colors require regular cleaning to eliminate the build-up oil stains and finger prints. White colors show the accumulation of dust and require frequent gentle cleaning. Laminates are the easiest to keep clean as their surface is nonporous and highly stain and oil resistant. Never use metal cleaners on or around pulls. If you cannot clean hidden grime, carefully remove the pull and clean separately before reinstalling.
Spic & Span, which contains abrasives Sodium Carbonate and Sodium Silicate.
Tilex, which contains Sodium Hypochlorite.
Comet, which contains abrasives Calcium Carbonate and Sodium Carbonate.
Chlorine Bleach, which contains Sodium Hypochlorite.
Hand Washing Liquid, which contains Alpha Sulfo Methyl Ester and Sodium Laureth Sulphate.
Glass Cleaner such as Windex, which contains Isopropanol, Alkylbenzene Sulfonic Acid Propylene Glycol Methyl Ester.
Ammonia. which may have a caustic effect,
Furniture Polish / Pledge, which contains Silicone Emulsion Waxes.
Avoid impact or striking the finished surfaces with hard metal objects, since this can produce a permanent indentation, cut or chip, particularly along edges. In the event of this type of accidental damage, minor nicks can be repaired, depending upon their severity. We recommend using a certified furniture refinisher, sometimes referred to as a cabinet doctor. For painted lacquers, you may also order a color match Fil-Stick and waterborne lacquer spray sealant. See the Help entry below.
Our painted lacquer panels are finished with 2K catalyzed polyurethane, the highest standard for durable kitchen cabinets. It is an extremely hard surface but sometimes accidents happen, even to the best finishes. This is how we suggest touching up the painted panels:
Where vigorous scrubbing has created shiny spots in the stain finish:
Even out the sheen by lightly applying waterbase clear lacquer spray on the clean surface. Use this product:
Mohawk Perfect Blend Waterborne lacquer M102-0613 Matt 19-23 sheen aerosol spray can. Follow the instructions for proper application.
To fill small nicks and dings:
Use wax Mohawk fil-stick to gently cover the nick and seal with the clear water base lacquer spray listed above.
Mohawk fil-stick in colors matching dcabinets standard colors
P1 Warm White -use M231-9844
P2 Cool White - use M231-8618
P3 Gray - use M231-1476
P4 Greige – to be determined
P5 Taupe – to be determined
P6 Blue - use M231-9853
P7 Dark Gray - use M230-4029
These products may be purchased by calling your local (WRP) Wood Repair Products store. Touch-up products may be ordered online. However, you may wish to confirm color match and availability by phone. Follow the instructions carefully. Rub the nick with the wax pencil, remove the excess and lightly dust the repaired area with the spray lacquer sealer. If you have ordered a custom color, Wood Repair Products will require a color match chip to confirm the proper Fil-Stick.
Avoid exposure of finished cabinet surfaces to high hear (160 F) steam or warm cooking oil. When broiling with the oven door open, or using the self-clean cycle of your over, open the doors and drawers of the adjacent cabinets to minimize exposure to high heat.
Be aware of countertop appliances such as boilers, vegetable steamers, toasters, toaster overs, tea kettles and appliances that create high heat and or high moisture. Turn a tea kettle in toward the stove hood fan as opposed to facing a cabinet end panel. Pull coffee makers out and in front of upper cabinets so steam will rise in front of the cabinet door instead of concentrating under the light valance panel or upper cabinet. When deep frying place deep fryers under the over hood fan and turn the unit on low to minimize grease on the cabinet doors above.
Be aware of candles or intense lighting fixtures located close to finished surfaces as open flame may discolor the finished surface. Be aware of strong light patterns such as window blinds or items placed directly on finished surfaces (such as childrens art work) as wood naturally "warms" with time, due to exposure to light, and this may produce an unwanted fading pattern or shadow. Sunlight may also cause the wood panel to dry and shrink causing the panel to distort in shape. This occurs with most natural wood products. Avoid taping or gluing objects directly to cabinet surfaces. Some adhesives are stronger than the painted surface. Over time, objects glued to the surface may cause a faded or ghosted outline.
Decorative metal hardware (door pulls and knobs) should be cared for in the same manner as the cabinet fronts. Cleaning should be done using only a mild dish soap and warm water. Avoid the use of metal polish or abrasive cleaners; as they may damage the sheen and discolor the cabinet finish.

